I've been stuck in a hotel for about a week after a nine month business trip. Between eating, sleeping, and going to the gym, I've decided to play through a few games on Vassal to learn V4. Since I have no shortage of free time, I decided to try documenting my experience. Maybe you'll learn a few things along with me.
There's a limited set of units in the module I'm using. Those of you with keen eyes will notice proxies are used in some cases.
I'm going to try out my planned armored car company. I figure if it can hold off the legendary scout tank hoard it will be ready for anything!
 |
| German forces. |
 |
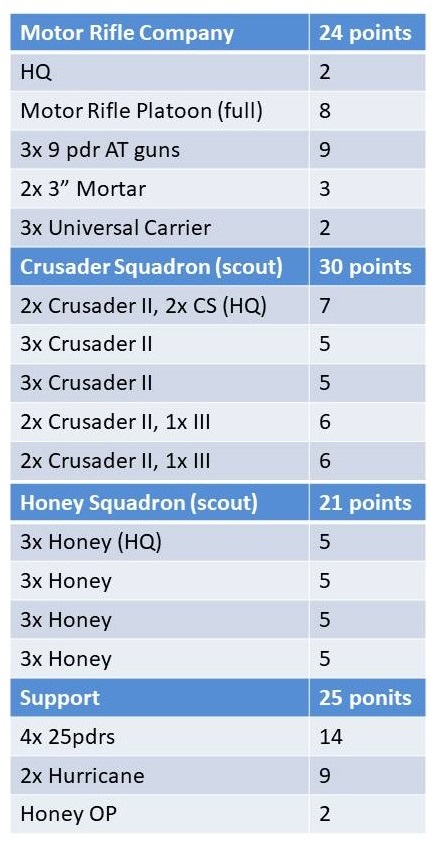
| British forces. Thsi is the pre-nerf version of the scout tanks force. |
The More Missions matrix was used to choose the mission...
British forces choose to Attack!
German forces choose Mobile!
Mission: Contact!
 |
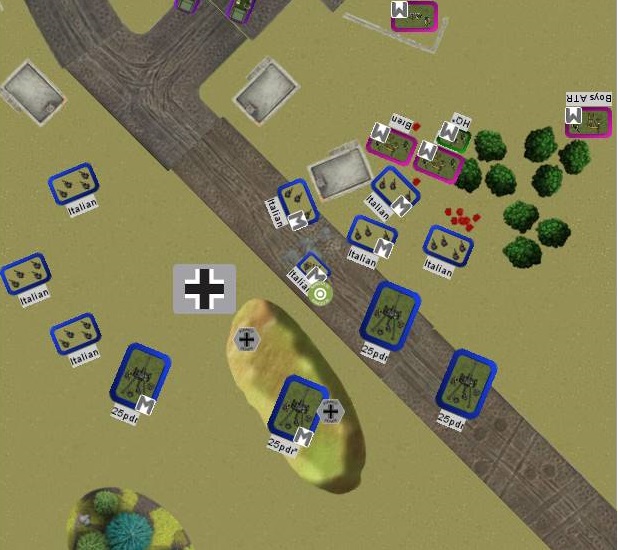
| Germans will defend from the South and British will attack from the north. Terrain-wise everything is what it looks like. Those individual bushes around the pond in the center and on the bottom right will be treated as concealment and slow going. |
 |
| Germans deploy their infantry platoon, company commander's SdKfz 221, and 6pdrs on the left objective. Italians and 25pdrs are on the right. Marders are in abmush. Everything else is in delayed (yuck) scattered (bleh) reserves. British have 25pdrs on the left flank along with a troop of crusaders. In the center is 3" mortars, and the crusader squadron HQ along with another crusader troop. On the right is the motor platoon and HQ, universal carriers, OP, and 6pdrs. |
 |
| No reserves arrive. All tanks, infantry, and the carriers advance. 25pdrs and 3" mortars lay down smoke screens to cover the advance. |
 |
| Germans range in a couple of bombardments, but with no effect. A PaK38 manages to get off a pot shot at extreme range, bailing a crusader. |
 |
| British move into position for a an assault. Crusaders lay down a smoke screen in preparation for an assault on the left objective. 3" mortars range in on the right objective. They do no damage, but pin the Italians infantry and 25pdrs. The conditions are set for an assault on both objectives and it's only turn 2! |
 |
| Assault 1, left flank. |
 |
| Crusaders on the left assault into the 8cm mortar team on the hill. |
 |
| No losses to defensive fire. German mortar team goes down. |
 |
| Germans pass motivation (after a re-roll from commander) but decide to fall back, denying the British an assault with their other group of Crusaders. |
 |
| Assault 2, right flank. |
 |
| Motor rifle platoon and HQ charges into contact, loosing two teams to defensive fire on the way in. They actually too four hits on the way in...so close! |
 |
| Only one Italian team is killed. They roll a 6 for counterattack; they take this as a sign that fortune is on their side and surge forward. The British motor company commander is killed in the melee, but the 2iC takes his place. |
 |
| British counter-attack, killing two more teams. |
 |
| Italians roll a 6 to counter-attack again! "With so many positive waves maybe there's no way we can loose. Let's do it!" (translated from Italian) |
 |
| MAMA MIA! The Italians whiff on the counter attack. Brits come back and kill two more teams. |
 |
| Itallians call it quits (rolls a '2'). Two 25pdr crews abandon their guns, fleeing in terror (they have a tactical move of '-' and were in the British 6" bubble). |
 |
| Motor infantry consolidate into cover. |
 |
| The Germans figure the objective on the left is secure for the moment. Marders ambush from behind the hill and move to machine-gun the British infantry. This was a mistake. One infantry stand withers under the...withering...machine-gun fire. A Crusader on the left is knocked out by a German 6pdr. |
 |
| British bring on Honies from reserves and prepare for the assault on the left flank. A 6pdr is killed near the left flank by sustained bombardments from the 25pdrs. On the rigth side the infantry dig in. Mortars kill another Italian team and pin the survivors down. |
 |
| Crusaders manuever to minimize AT fire. They make it in and score a kill. Germans pass motivation and hold fast, hoping to swing on the enemy tanks with their AT guns next round. They can't afford to fall back from the objective! |
 |
| British tanks pass motivation and kill two more teams. |
 |
| Germans pass motivation,but decide to fall back, bracing themselves for the next assault. The 2.8cm AT gun is only barely within 4 inches of the objective. The British move in, kill the only German team contesting the objective and drive the Germans back. 8-1 Win for the British on turn 3! |
Normally that would be the end of things. If it were game night, I would shake hands, "good game, got time for another?". If it were a tournament, I'd hope we had finished with enough to step around the corner and get a refreshing adult beverage before the next round.
The advantage here is there's a "back" button. I rewound things to the top of the German's turn two and considered what could have been done differently...
 |
| This time, the marders ambush in support of the left objective. Obviously, it is more threatened. What kind of dumptkopt would think otherwise? Two of the marders had to move out from behind the hill. Several British tanks are destroyed. The infantry that abandoned their positions last turn fail the skill check to dig new ones. |
 |
| The British can't set things up for a good assault this turn, but they do have a pretty good turn of shooting. British 25pdrs destroy an AT gun on the left side. Universal carriers kill a German 25pdr with MG fire. More tanks arrive from reserves. |
 |
| Germans pass last stand checks for the 25pdr and 6prs (there are two teams, but they are not quite in command). Combined fire on the left neutralizes the threat to that objective. Infantry on the left fail to dig in and no reinforcements arrive. |
 |
| The British sense the momentum is slowing down. They shift their focus to the objective on the right. |
 |
| The British infantry is set up for a final assault! |
 |
| One team is cut down by defensive fire when charging across the road. The other two connect with the remaining 25pdr. |
 |
| The Italians fall back, preventing another assault by British tanks this turn. |
 |
| Germans finally get some reserves! Panzer IIIs show up just where they are needed. An armored car patrol arrives on the left flank. (forgot to place it this turn. |
 |
| German tanks arrive and take up positions to secure the objective on the right. |
 |
| They manage to kill one infantry team, but the other is able to escape. |
 |
| An uninspiring turn for the Brits. I may have missed a turn. (This could be turn 6?) |
 |
| Reinforcements continue to arrive. The objective on the left is under threat again from a swarm of British tanks. |
 |
| Nothings special happens during the British turn 6. Italian infantry assault and kill the final British infantry team on the right. The noose is now tightening around the remaining British tanks. |
 |
| The British artillery does manage to whittle down town the German infantry until they must make a last stand check. I think the German commander's armored car is somewhere in all that wreckage too. |
 |
| Schleppers range in on the 25 pdrs, killing one. |
 |
| Brits are still in the fight. Combined fire from Hurricanes and 6 pdrs wreck several panzer IIIs. |
 |
| German infantry and Panzer III platoon quit the field. However, schleppers kill two 25 pdrs! |
 |
| 25 pdrs leg it, leaving the left British objective unguarded. At this point the only British forces left on the board are the mortars and 6pdrs. The only way the British player could not lose at this point would be to run the clock out to a draw in a very ungentlemanly-like manner. 6-3 win for the Germans. |
Lessons Learned, Thoughts, and Questions:
1) In an assault it is important to fall back early if you won't win. This is particularly true if doing so will not immediately endanger the objective. If the Italian infantry had not counterattacked in turn two, they would have had the strength to comfortably hold the objective on the right. There was a similar moment in turn 3 (the first go round) with the Germans on the left as well.
2) Position defenders ahead of the objective to give you space to fall back. I already knew this was a good practice, but I avoided doing this on the left side because it would have put my infantry under a British ranged in marker on turn one. I think this was the wrong call. Even with re-rolling saves, the teams under the template probably would have lasted at least a turn or two, which is more than they did in this case. Also, if the British artillery had been pounding on the infantry they couldn't have stopped to lay a protective smoke screen.
3) I think the British list would have been better as two formations, more bulked out.
4) Multiple smoke screens are great. The British access to multiple, cheap smoke screens is quite impressive. I'm wondering if they are better off taking two batteries of two 25pdrs instead of one battery of four just to get extra smoke.
5) I'm thinking about re-working the armored car list. I would have liked to have had a platoon or two of armored cars start on the board. My reason is they can be push forward into cover and go to ground. This would have slowed down the British because they can't move at dash speed if they pass within 8" of an enemy team.
6) The German armored car company is hard to break. If you take enough of the corps units it is quite difficult for your opponent to eliminate enough.
7) Contact seems like a very poor mission for the defender. I'm not saying it's easy for the attacker either, but the most likely outcome for the attacker seems to be a win or a draw. By the time the defender has fought off the attack, it seems unlikely they have enough turns/time left to win with what they have left. The Germans would have pulled it off in this case, but that was with no time limit. I think this game would have been a draw due to time in a tournament.
Not sure what I think about using Vassal for battle reports. It may be a useful supplement to a "real game". On it's own, it feels a little dry.
Did I get anything wrong? Let me know below.